
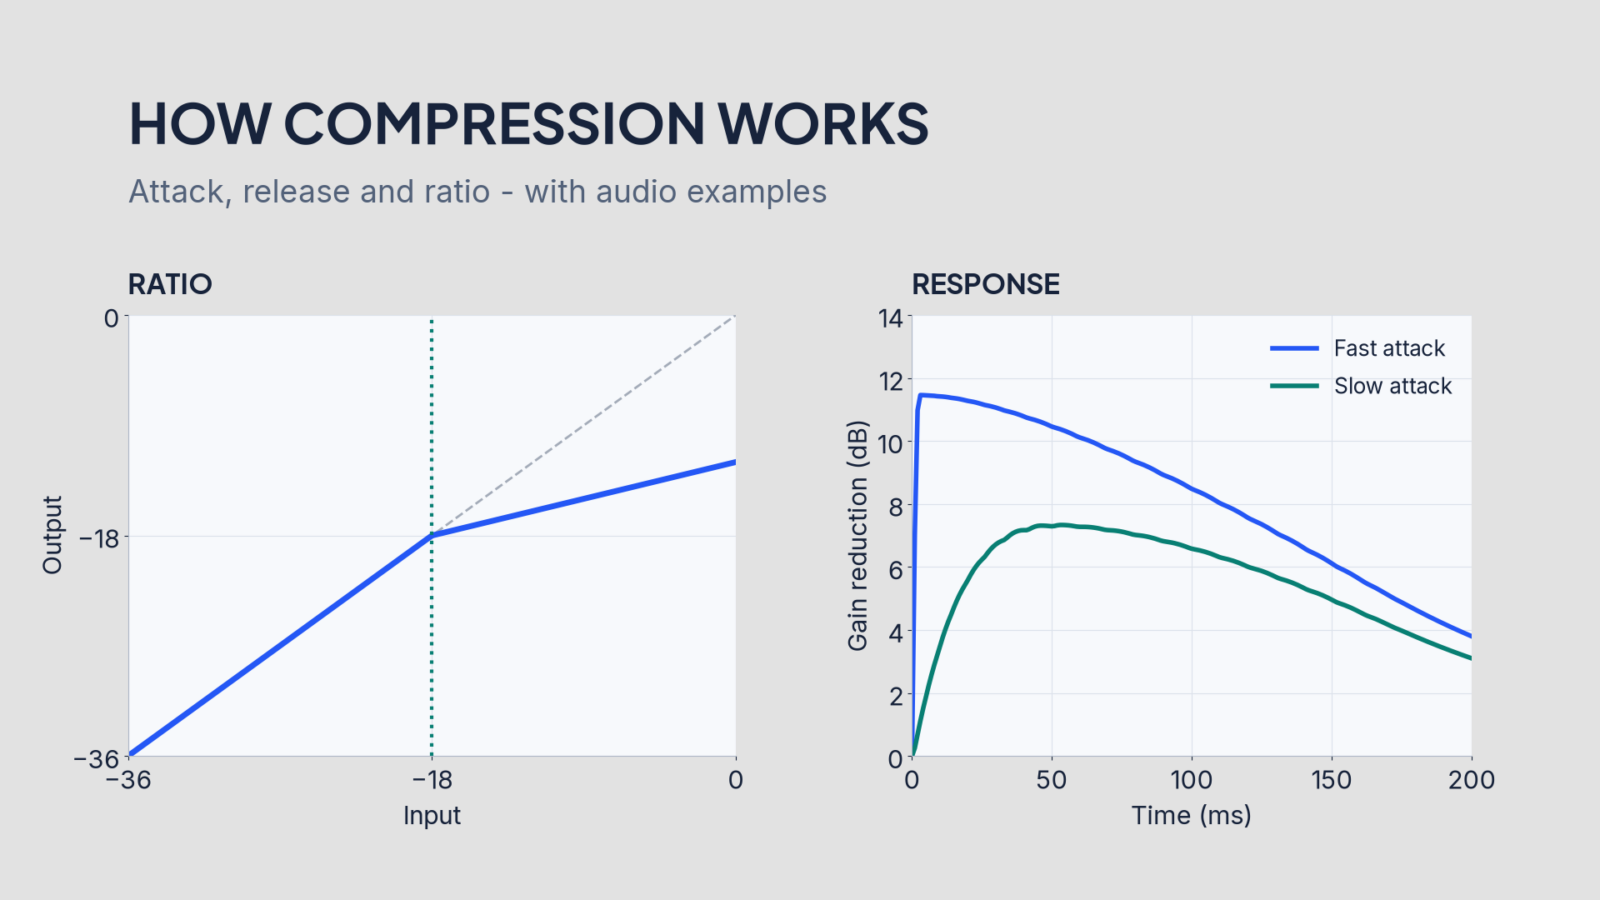
Learning how to use compression gets easier when you give the compressor one clear job. Perhaps the snare jumps out of a drum loop, a bass line changes level between notes, or a vocal needs to stay closer to the front. Start with that problem, then choose the controls that address it.
You don’t need to memorize a setting for every instrument. Threshold and ratio determine how much level control you ask for. Attack and release shape how that control develops over time. Output gain helps you compare the result fairly.
Below, you can hear the same original drum pattern with different timing settings, follow a short exercise in your own DAW, and see why turning every control further doesn’t necessarily improve the track.
How to Use Compression: Start with the Goal
Before inserting anything, finish this sentence: “I want this part to…” Keep the answer specific. “Stop jumping out on two notes” gives you a clearer target than “sound professional.”
For a first exercise, choose a compressor with visible threshold, ratio, attack, and release controls. Your DAW’s stock plugin is enough. Turn off automatic makeup gain, leave the mix fully wet, and disable extra saturation or automatic timing while learning the basic response.
Then loop a passage that includes both normal playing and the moments you want to change. An isolated loud hit tells you very little about how the compressor will recover before the next one.
Threshold and Ratio: What Gets Turned Down?
Threshold marks the level around which compression begins. With a hard knee, a signal below that point receives no gain reduction from the basic compression curve. Above it, the ratio determines how much additional input level reaches the output.
At 3:1, a steady input that sits 6 dB above the threshold produces an output 2 dB above it. For example, with a -18 dB threshold, an input of -12 dB becomes -16 dB before makeup gain. The difference is 4 dB of gain reduction.
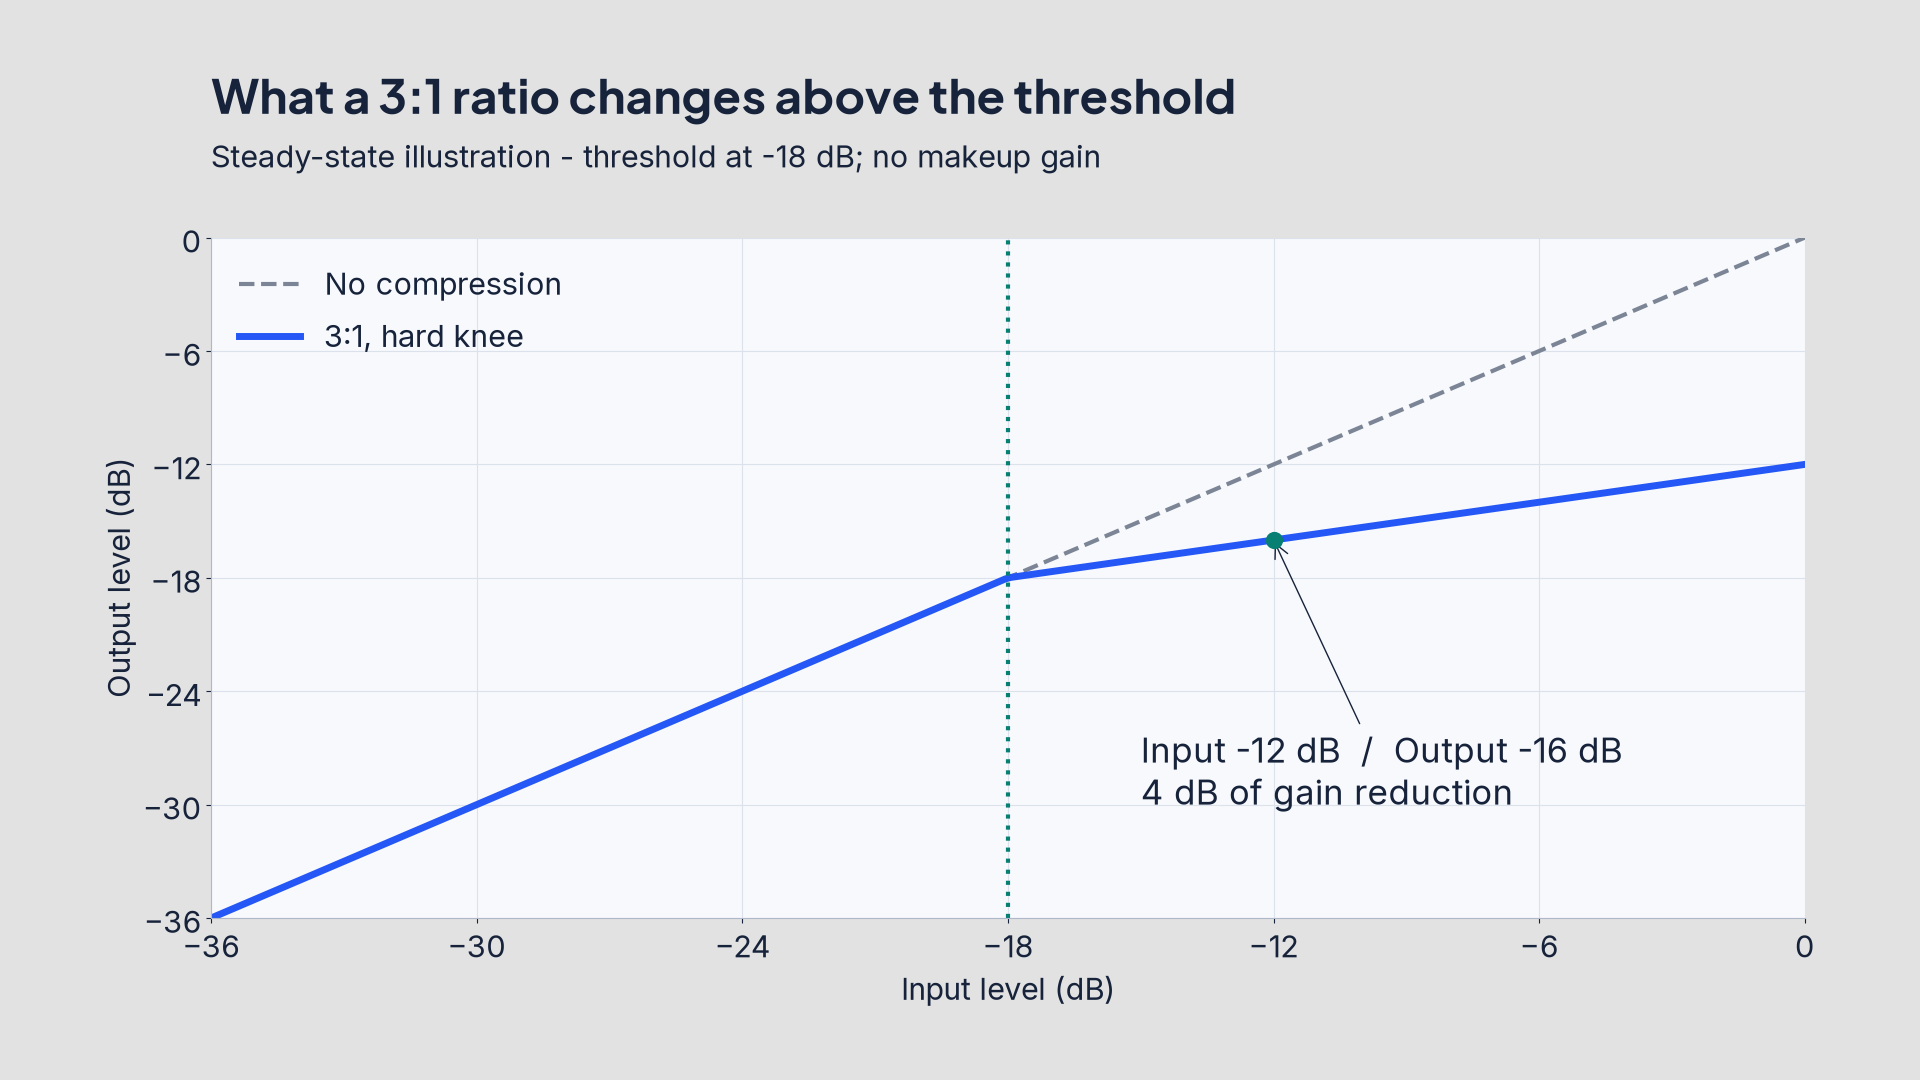
That is a steady-state example, not a guarantee about each drum transient. Attack, release, detection, and knee behavior affect a changing signal. A soft knee also spreads the transition around the threshold instead of introducing one sharp corner.
Lowering the threshold usually makes more of the passage trigger compression. Raising the ratio makes the response above the threshold steeper. Try them separately: otherwise, you can lose track of which change made the part feel smaller.
Use Compression to Shape the Attack
Attack describes how quickly gain reduction builds. It doesn’t mean the compressor waits for that many milliseconds, then suddenly switches on. Most designs begin responding as the detector asks for compression and move toward the required reduction over time.
A faster attack can reduce more of a drum’s initial hit. A slower setting can let more of that front edge through before the compressor pulls down the following body. However, very short attacks can also introduce distortion, particularly on low-frequency material.
Listen to the first part of the sound separately from its sustain. Does the snare lose its crack? Does the bass note become steadier, or does the beginning vanish? Those questions tell you more than whether the meter reaches a particular number.
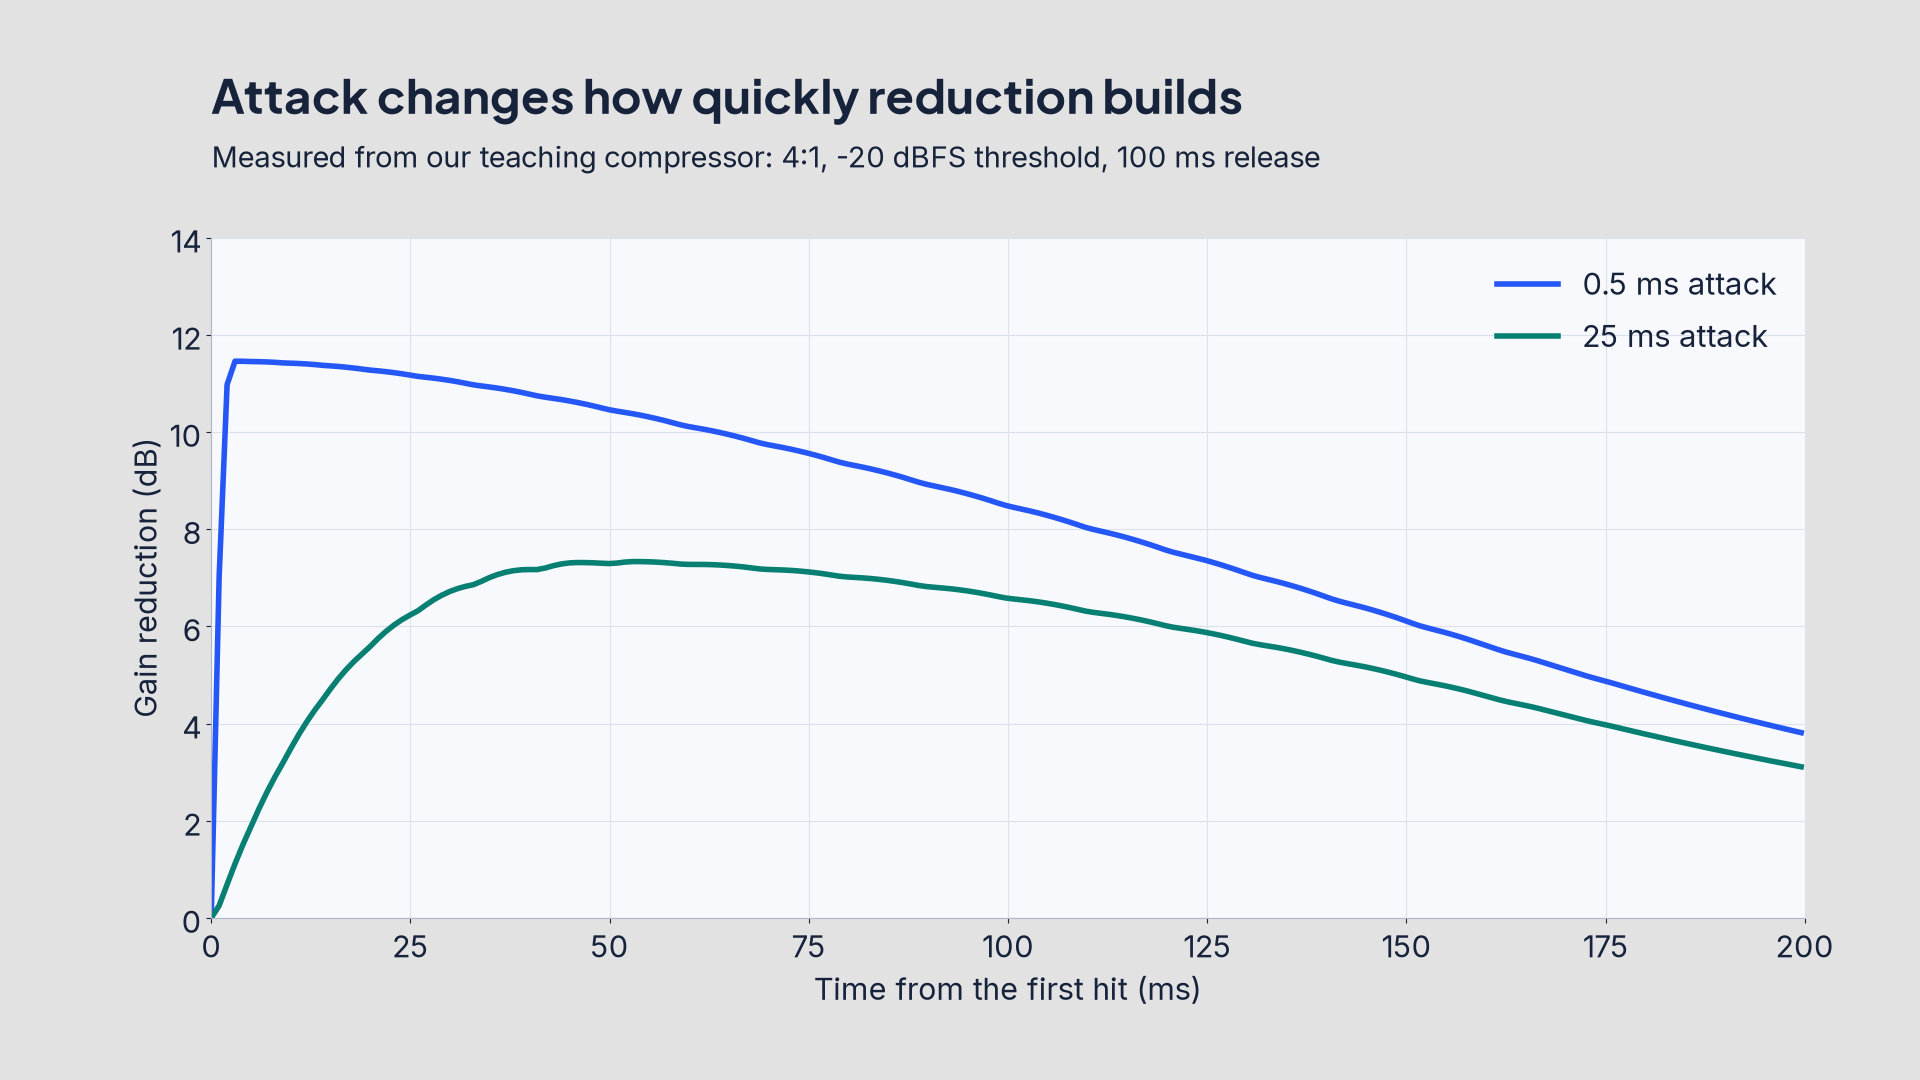
The chart shows gain reduction during the first 200 milliseconds of our example loop. The fast setting builds reduction earlier. The slower setting allows more of the initial event through. Different compressor designs can behave differently at the same displayed timing values. For a concrete example, Ableton’s Compressor manual explains its peak/RMS detection and envelope options.
Hear the Timing Changes
These examples use an original four-bar synthesized drum loop at 110 BPM and a simple custom peak compressor. They illustrate the controls rather than review a particular plugin. All compressed versions use a -20 dBFS threshold and 4:1 ratio.
The files share the same whole-file RMS level, approximately -23.16 dBFS, after processing. Their peak levels still differ. Equal RMS makes the comparison more useful, although it doesn’t guarantee identical perceived loudness.
Play one version at a time and keep your listening volume unchanged.
1. Original loop - no compression
Follow the kick, snare, and quieter details between them. This is the reference for the other three versions.
2. Fast attack - 0.5 ms attack, 100 ms release
Compare the front of each main hit with the original. Focus on its shape rather than assume that the compressed file must be better.
3. Slower attack - 25 ms attack, 100 ms release
Only the attack setting changes from version two before output-level matching. Listen for the relationship between the initial hit and what follows it.
4. Longer release - 25 ms attack, 600 ms release
Compare this with version three. The longer recovery carries more reduction between events. Follow how that changes the quieter parts of the pattern.
Download the original loop as a WAV file to try the same passage in your DAW.
The example’s attack and release values control gain smoothing in a teaching algorithm. They aren’t settings that promise the same result in every commercial compressor. Use the exercise below to explore the response of your own plugin.
Release: Let the Next Note Breathe
Release controls how quickly gain reduction recovers when the detector calls for less compression. If recovery takes too long, one loud hit can leave the next event quieter than you intended. A very fast recovery can create audible movement or distortion instead.
On drums, listen between the main hits. Does the room or hi-hat seem to rise sharply after the snare? Does the whole loop stay held down? Decide whether that movement supports the rhythm before changing anything else.
A tempo calculation can provide context, but it doesn’t provide a universal release setting. At 110 BPM, a quarter note lasts about 545 milliseconds. A compressor’s displayed 545 ms release doesn’t necessarily mean its gain reduction returns completely to zero at the next beat.
Automatic release can help with changing material. Still, compare it with a manual setting while learning how to use compression. That gives you a better sense of which behavior the automatic mode changes.
A Short Exercise in Your Own DAW
To practice how to use compression, try the downloadable loop or a recording you know well. These are exploratory starting points, not a preset you must keep.
- Set a clear reference. Loop the passage and keep the compressor easy to bypass. Start with automatic makeup off and the mix at 100% wet.
- Choose a moderate ratio. Start around 3:1 or 4:1, then lower the threshold until the louder hits produce an obvious, useful amount of reduction.
- Compare attack settings. Try a short attack, then move toward 20-30 ms. Keep the other controls fixed and listen to the first hit of each note.
- Adjust the recovery. Start around 100 ms, then compare a much longer release. Watch whether reduction carries into the next important event.
- Match the output level. Use makeup or output gain so bypassing doesn’t create an obvious loudness jump. Take time with this step.
- Return to the mix. Reduce the effect if the part loses its role. A setting that sounds exciting alone may make the drums less effective beside a bass line.
Once you recognize the change, try a lower ratio or less reduction. Strong settings can make an exercise easy to hear, but they don’t have to become the final sound.
How to Use Compression Without Chasing Loudness
A louder result can feel fuller even when it weakens the groove or removes an important transient. That is why output matching belongs inside the process, rather than at the end as a formality.
Compare a short passage several times, then extend the loop. The chorus may trigger more reduction than the verse. A fill may keep the detector working after the normal pattern has resumed. Adjust for the whole performance, not one flattering moment.
Meters help explain what happens, but they don’t define success. Two decibels of reduction can make a meaningful difference on one source; another may tolerate a much stronger effect. There is no required meter reading for a finished mix.
If large phrase-level differences remain, use clip gain or volume automation first. That can leave the compressor a smaller, more consistent task instead of asking it to repair every balance decision.
Common Problems and Useful Next Moves
| What you notice | What to investigate |
|---|---|
| The drum loses its initial hit | Compare a slower attack or less reduction. Check output level before deciding. |
| The next note stays too quiet | Try a shorter release and check whether a previous event still drives the detector. |
| Bass notes make the whole track dip | Compare a detector high-pass filter, if available. It changes what triggers compression, rather than directly removing audible bass. |
| The result sounds rough or buzzy | Compare less reduction and longer timing settings. Also check clipping elsewhere in the chain. |
| You prefer it only when it is louder | Match the bypass and processed levels, then repeat the comparison. |
Change one thing at a time. If a slower attack helps but the peaks become too strong, decide whether another task needs a separate processor. Forcing one compressor to control every peak, shape the groove, and level the whole performance can make each job harder.
When Not to Use Compression
Leave the compressor bypassed if the part already has the balance and shape it needs. A sampled drum or heavily processed synth patch may arrive with substantial dynamics control already in place. Another compressor can simply reduce the contrast that makes it useful.
Compression also won’t restore missing information from a clipped recording or fix a poor arrangement. Identify the actual problem before adding another stage. Sometimes moving a fader, changing a note, or editing one loud phrase is the more direct solution.
Choosing a Compressor for the Exercise
Use a tool whose controls let you follow the steps. Waveform Compressor can help connect the signal’s shape with its gain-reduction display. Your stock compressor can do the same basic exercise if it exposes manual timing controls.
Our free compressor plugin guide compares several alternatives for simpler leveling, detailed control, and stronger character. Choose a different tool when its response solves a problem you can identify, rather than expect a new interface to make every decision for you.
The useful test of how to use compression is simple: after a fair comparison, does the part do its job better? Keep the change when you can explain what it improved. Otherwise, bypass it and return to the musical problem.